The Earth's Motion
by Dr Jamie Love © 1997 - 2011
 © 1997 - 2011
When thinking about astronomy, one thing to keep clear in your mind is whether you are thinking about the sky's image or the image of the sky that you have from your current location. You see, the stars are fixed in their positions (for the most part) and if you were floating in space you would see an unobstructed view of the unchanging sky. Sadly, you are stuck here on Earth so part of your view is hidden by the horizon and the Earth's motion complicates things. We use special names for observational positions that depend upon our location. These are different from the sky coordinates I mentioned earlier (like right ascension, and which we will come back to very often in this course). It is convenient to image the stars as stuck to a celestial sphere - an imaginary sphere surrounding the Earth. Our view of that sphere depends upon where, on Earth, we are. The Earth's rotation makes the celestial sphere appear to move. An astronomy student must learn how to imagine the effects of the Earth's rotation and its apparent effect on the celestial sphere, in order to make sense of what s/he sees.
Sounds complicated.
It isn't too difficult. I'm here to teach you how to imagine the celestial sphere, the motion, and how that affects your view. I'll start by introducing you to two very important terms in observational astronomy - zenith and meridian. They both depend entirely upon your location.
Zenith is the point in the sky (on the "celestial
sphere") directly overhead. Easy!
Just to give you a complete education, nadir is the point
directly opposite the zenith, so it is below your feet (assuming
you are standing  ). Nadir is not used very often in astronomy but
people talk about their zenith all the time.
Don't confuse your zenith for the center of star rotation!
The stars revolve around Polaris, not your zenith - unless you are at the North Pole because then Polaris will be at your zenith.
|
Because the sky (celestial sphere) is constantly in
motion, due to the Earth's rotation, the stars at your zenith are
constantly changing. Regardless, your zenith is always overhead
- straight up. Your zenith is a useful point in the sky because
it helps to define your meridian.
Meridian is a great circle on the celestial sphere that
passes through your zenith and also through both celestial poles.
Your meridian line extends all the way around the Earth (and intersects
your nadir, on the other side).
Notice that both your zenith and your meridian are determined by you and not by things like RA or the stars. Granted, Polaris will always be on your meridian but that is because it happens to be the center of rotation of the celestial sphere. | 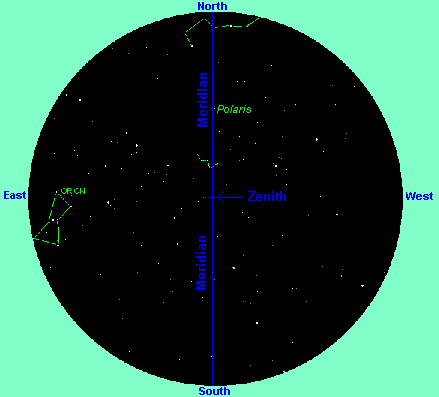 |
Objects on the celestial sphere, including RA and stars, will move across your meridian and some may pass in and out of your zenith. As time goes by any star at your zenith, and any RA line along your meridian, will move on.
If there is a noticeable star at your zenith right now consider yourself lucky! On the other hand, all 24 RA lines will eventually cross your meridian line. Indeed, each RA line will cross your meridian line twice a day, once across your northern meridian and once across your southern meridian. Your meridian is important in observational astronomy because it allows you to determine when a star or planet will be directly south or north of your zenith. (You'll learn how later in the course.)
If you were at the North Pole, Polaris would be at your
zenith (actually pretty close) and the RA lines would all converge
at your zenith. You probably don't live at the North Pole. (If
you do - hey, where's that telescope I wanted!  ) Therefore,
your zenith will be south of Polaris. Also, the RA lines will
not be placed evenly overhead - they will all converge at Polaris, north of your zenith.
|
This diagram is a slice of the Earth along the meridian line far from the North Pole. Imagine that the sphere of the Earth extends behind the face of the screen and also outwards towards you. Stars (or the Sun) will rise on the eastern horizon (behind the screen) and, as the Earth rotates, they will move from behind the screen and eventually cross the face of the screen as they slice through the meridian line. Then they will continue to move westward, outwards from the screen, and then they will set in the west, below the horizon of this observer.
The same idea applies to your location but, unless you are at the Equator, the circumpolar stars can move from west to east!
A wonderful way to become familiar with your meridian line, and
how the stars move across it, is to spend an evening lying on the
ground looking up at the stars. (You might want to save this idea
for summer! |  |
The next night that you are outside find your zenith and imagine
your meridian. You should be able to find north using Polaris
but it isn't easy to extend imaginary lines all the
way from Polaris to each horizon (north and south). A magnetic
compass would be useful.
[Note that magnetic compasses don't point
to true north and they are affected by local iron deposits, but
they are easy to use and will give you a general idea of north.]
Before we leave this topic I should teach you two other terms - altitude and azimuth.
Altitude is your height above sea level. Right?
Ah, sort of right.
Unfortunately, astronomers use the word - altitude - to mean something different.
The altitude of a celestial body (star, planet, etc.) is the angle, measured in degrees, above the nearest horizon. Think of altitude as the vertical angle for an object.
|
A star on your horizon has an altitude of zero degrees (0o).
[In this image I have exaggerated the height of the observer. In reality a star on the horizon would be horizontal to his/her view.] A star at your zenith has an altitude of 90 degrees (90o). |  |
But how do you know which horizon you are talking about?
Ah, that's where the star's azimuth comes in.
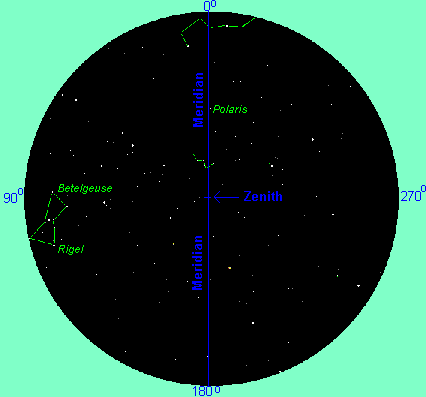
Azimuth is the horizontal direction or bearing of an object in the sky. It sets the line along which the altitude is measured. The azimuth is designated as the angle created by that imaginary line and true north.
True north has an azimuth of 0o, east is at 90o, south is at 180o and west is at 270o azimuth.
|
Polaris always has an azimuth of zero (0o) - or pretty darn close. That's because Polaris is always due north (or pretty darn close).
Your meridian always runs along the zero and 180 degree azimuth bearings. That should be obvious if you understand what I said earlier about your meridian. (If it isn't obvious, back up and read that part again.)
In this image the constellation of ORION (the hourglass-shaped constellation) has an azimuth of about 100o.
|  |
Understand that, as the Earth rotates and the sky moves, a star's altitude and azimuth changes. When (if) you set a telescope on a star (or the moon, a planet, etc.) it will slowly drift out of alignment due to this motion. A fancy telescope will have gears and mountings that allow you to scan easily along with this motion. Some telescopes even have tiny motors that do the scanning for you! You should also understand that stars are constantly moving across your meridian and into or out of your zenith. All this motion is apparent motion meaning it looks like the stars are moving but, in fact, it is the Earth that is moving. In other words, the terms azimuth, altitude, zenith and meridian are your "Earth-based" coordinate system and an object in the "heavens" will move through those coordinates. Your Earth-based coordinates are yours and yours alone. You can describe an object in the night sky as being at "220o azimuth and 19o altitude at 3:15 (AM) on January 3rd" and that is perfectly acceptable to you because it is an observation taken at YOUR PLACE AND TIME. However, someone else looking at that same celestial object would come up with different values because his/her position on the Earth is different from yours. (Even if they are making the observation at the same time, the altitude and azimuth will be different due to the difference in position of the observers.)
On the other hand, celestial coordinates, like RA, are "universal" in the sense that a star's RA does not change as the Earth rotates and it is constant regardless of the observer's position or time of the observation.
Let me use an Earth-bound example to show you what I mean. London is located at the Earth coordinates of 51o north latitude and 0o west longitude. That's were it is and that's where it will always be. Just like a star stuck to the celestial sphere. Someone in Edinburgh (a beautiful city in Scotland) would explain that London is south of them while someone in Winnipeg (Canada) would insist that London is very much to the east. They are both right. The position of London, with respect to their own position, is different for each observer but its coordinates on Earth will always be 51o north latitude and 0o west longitude.
So the description they give (south of east) is useless and only the latitude and longitude matter.
Well, I wouldn't go that far.
If you were in London and wanted to go to Edinburgh it is useful to know that Edinburgh is to your north.
You see, both methods of describing the position of London are useful - it just depends on what you are using them for.
Most "classroom" astronomy is dominated by celestial coordinates, like RAs. (Most geography courses are dominated by latitude and longitude.) I will refer to celestial coordinates often through this course because I will be teaching you astronomy that is relevant anytime and anywhere. However, most observational astronomy - the astronomy you actually DO - is dominated by the Earth-system of coordinates. (Geography courses usually make sense when you understand where these places are with respect to you!) Don't let that worry you. You'll find that you can easily adapt from one system to the next in your conversations and thinking.
[There are equations that let you switch from Earth-based systems to celestial ones but there is no need to learn them. Software programs do all that hard work nowadays. If you are interested in the maths, you can find places on the Internet that describe it but be prepared to do some heavy calculations involving trigonometry!]
The ancients believed that the Earth was the center of the universe
and that the other planets, the Moon, the Sun and indeed
everything, revolved around the Earth! That's an easy mistake to
make because at first thought that idea makes sense. Today we
know that is not true but we often use that kind of imagery to
help us follow the motion of the "heavenly objects".
Indeed, observational astronomy is full of short cuts and "slang"
that give the wrong impression, but that wrong impression is so
useful!  We often speak of the "stars revolving
around Polaris" when what we mean to say is that the
stars appear to revolve around Polaris. In fact,
stars have very little (relative) motion of their own and they
certainly don't revolve around Polaris. But that is how
they appear to behave. Similarly, we will say that
an object is rising or setting when in fact it is really standing
still (for the most part) and it's the motion of the Earth that
gives it the appearance of rising and setting.
So, how does the Earth move?
|
Our planet rotates about its axis and that rotation produces the
events we think of as rising and setting as well as the apparent
rotation of the stars around Polaris. This view shows the
Earth's rotation, speeded up a great deal. In this animation
the Sun is over to the right as it illuminates
(that means "shines on") the Earth. The far left side
of this image is dark because the sunlight doesn't reach it, but
notice that as the Earth rotates every part of our planet eventually
receives sunlight.
Specifically, as the Earth rotates, your home moves from the dark side to the Sun lit side and you experience "sunrise". | 
|
Take a look at this globe and find your location
(roughly). Notice how it swings into the sunlight. Your "sunrise"
has nothing to do with the motion of the Sun. It has to
do with the motion of the Earth and your position on the planet.
Can you see "sunrise" occurring at your location in
this animation? (If you have a very fast CPU this image will be whirling around pretty fast!)
Also, notice that sunrise occurs in Europe before it occurs in
America. The Sun rises in Edinburgh (Scotland, my
home) about 5 hours before it rises in Baltimore (Maryland, my
birthplace). Indeed, sunrise is occurring somewhere on Earth all
the time! This difference in sunrise or any similar "sky
event" is what gives rise to our different time zones.
The entire planet is divided into time zones similar to the
right ascension lines you learned earlier. Time zones tend to
follow lines of longitude, but for political reasons, some time
zones are a bit twisted. Each time zone is one hour different
from its neighbors. (But there are a few "half time zones" in Asia, Newfoundland in Canada and Adelaide and Darwin in Australia that differ by 30 minutes! Kathmandu is five and three quarter hours ahead of UT.  )
)
The time zone to your east is one hour ahead
of your own time zone and the time zone to the west is one hour
behind your own time zone. That's because "daily local celestial events" like sunrise (or sunset, noon or midnight) occur before your event in all places to your east and after your event in all places to your west.
If you study this animation I hope
you will see why that is so.
What is the correct way to tell time?
Astronomers have chosen Greenwich, England (the site of a famous
observatory, close to London) as their special time zone. Whatever time it is in
Greenwich is called Universal Time (abbreviated UT).
Well, that's almost true. Like folks in many other parts of the
world, during the autumn the people of Greenwich set their clocks
back an hour for the dark winter months and then set it forward
an hour in the spring. That complicates the calculations but don't
let it worry you. The UT clock remains the same throughout the year regardless of what the people of Greenwich do.
If a special astronomical event is predicted
to occur (say, an eclipse), astronomers
will give its time in UT. You will have to subtract the right
number of hours from it to get your local time (if you live west of Greenwich, England) or add the right number of hours (if you live east of there). And you will
have to take into account your own "Daylight Savings Time"
if that is appropriate.
The USA Navy have a universal clock on the Web.
When you downloaded this page I tried to take a peek at their clock and it read  . If you are offline, I could not get that time but don't worry about it. When you want, go online and make a note of how far off your local time is from UT.
The military use a 24 hour time system. They say "2100 hrs" or "twenty-one
hundred hours" instead of "9PM". This is an excellent
way to think of time and astronomers use it too. (Most Europeans use "24 hour time" but few of them use UT.)
When dealing globally, across time zones and countries with different "seasonal times", the military often includes the letter "Z" (and call it "Zulu") after the time to let you know it is universal time. So, if you want to know what time it is, call the Pentagon and ask to speak to the man in charge
of global naval operations. He'll set you straight! 
In this course I usually will not be dealing with such specific timed events so I will not need to refer to UT. However, you should be aware of it and understand why astronomers use it.
I'm still confused about things like sunrise and sunset. And my direction too!
|
That's OK. It's not an easy subject for some people to grasp.
This animation may help you understand why the Sun rises in the east and sets in the west. Imagine you are on the surface of the globe near the Equator. The North Pole is at the top of the globe. Let's assume you are facing east. That would mean your left arm (shoulder) would be pointing northward (towards the North Pole at the top of this animation). In that position you are facing in the same direction as the Earth's rotation. As the Earth rotates, you are moved from the dark side to the light side and you will see the Sun "rise" on the eastern horizon. (Facing you. BUT NEVER STARE AT THE SUN. Not even sunrise!) | 
|
As the Earth continues to rotate the Sun would appear to move across the sky and eventually "set" in the west. (Behind you.) This animation does not show you sunset, but I'm sure you can imagine it.
Take a good look at this animation and imagine how sunrise would look from a point on the globe - from your home. Imagine the Sun's "motion" through the day and how it would set as the Earth "turns its back" to the Sun.
|
Now that you have a good idea about the motion of the Sun,
lets consider the motion of the stars.
Naturally, to see the stars you must be on the dark side of the Earth. You have to be in the night. Here I've added a piece of night sky above the North Pole. Imagine you are at the North Pole looking up at this chunk of sky. You would see the stars moving in a circle around Polaris. It's easy to get confused thinking about this. Trying to relate the Earth's true motion to the apparent motion of the stars and Sun is tricky. Give it a try. If you have any difficulty just remember that the Earth rotates counterclockwise (anti-clockwise) if you were looking down from the position of Polaris. I'm getting dizzy! And confused. OK. Maybe the diagram below will help you. | 

|
 |
[Note that the Sun is
not drawn to scale nor is it at the correct distance. Indeed,
it would be impossible to see what I am talking about if I drew
everything to the correct scale. Please assume that diagrams
such as these are not to scale unless I tell you otherwise.]
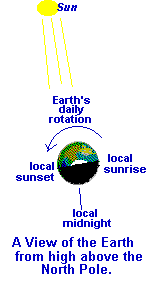
Here you see the view as if you were far off in space hovering above the North Pole. The Earth is rotating counterclockwise and you can see how sunrise and sunset come about. Also notice that I have labeled "local midnight". It is exactly opposite the Sun. Although I have not labeled "local noon" I'm sure you can appreciate that it is at the point of the globe facing directly into the Sun (and opposite local midnight). We can only see stars from the dark side of the Earth, because half the time, half the day, the Sun dominates the sky. Take a good look at this diagram then look back to the animation to see the side view again. Try to make it clear in your mind how sunrise, sunset, noon and midnight are caused by your location on a rotating Earth. Then try to imagine how the Earth's rotation causes the stars to appear to circle Polaris through the night. Think about stars rising and setting too. |
Not only does the Earth spin in a counterclockwise direction but it also travels around the sun in an counterclockwise orbit.
|
So if you were at Polaris and used a powerful telescope to
watch the Earth you would see our world as it moved around the
Sun.
Notice that we get to see a slightly different view of the night sky because of this orbital revolution. As the weeks go by the evening sky appears to move. What I mean by that is the stars in the sky at 9PM tonight will not be in the exact same position at 9PM next month. Take a look at this image (again, nothing is drawn to scale) and imagine how local midnight, or even local sunset, would give a different night sky as the Earth's position changed. From this view it appears that the stars are in a ring around us. In fact, there are stars in every direction but we cannot see the ones on the same side as the Sun. Half a year later the stars that were hidden during local noon are visible at local midnight because the Earth has moved so as to show a different "side" to the Sun during that part of the day. Over the course of the entire year you get a nice "tour" of the stars (and that is how I have arranged this course). | 
|
So, we are surrounded by a sphere of stars.
Yes. Sort of. There are stars in all directions but they are not equal distances from us so technically they do not form a "star sphere". These images from various positions give you the impression that the Earth is surrounded by a sphere of stars. Although that is not true, it is a convenient way to imagine them.
|
The Ancient Greeks (and probably other civilizations) imagined
that the stars were attached to a sphere of darkness and that
the Earth was at the center of the sphere. They also imagined
that the Sun, and all the planets, circled the Earth inside
the "star sphere".
A Greek astronomer named Ptolemy
wrote the first astronomy book (called "Almagest")
and laid down this geocentric (Earth centered)
view.
We now know that there is no sphere of fixed stars. Each star is at least as big as our own Sun and most stars you see are quite a lot bigger! But they are so far away that they appear very small and dim. Indeed, they are so far away that it is acceptable to imagine them exactly as the Greeks did, as a static "star sphere". | 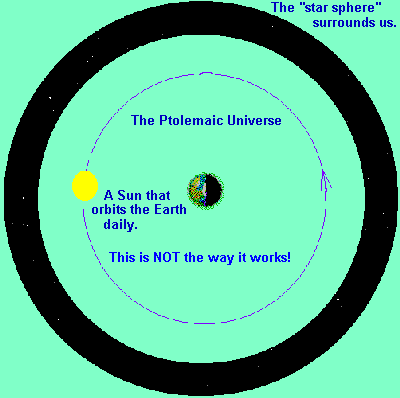
|
So the Earth's motion causes the sky to move?
Yes! Or, at least, it causes the night sky to appear to move.
When I say "Sirius will rise shortly" you know
that "Sirius-rise" is just like sunrise - caused by
the Earth's daily rotation and has nothing to do with the star
(Sirius) motion. Due to the direction of the Earth's spin
you know that the Sun rises in the east and sets in the
west. Indeed "everything" rises in the east and sets
in the west because of the direction of the Earth's rotation.
All astronomers, from professionals to amateurs, understand what they mean when they use these short-cut expressions and you will too as the course goes on. You'll use your "common sense" and an understanding of how the celestial sphere is arranged. That's an understanding that you will acquire in this course.
You probably already have some of that common-sense knowledge. For example, I may say that "Venus passes close to the star Spica" on a particular night but you know that the star is actually too far away for a planet to actually get near it. (And we haven't even talked about planets yet!) So you assume I am referring to its apparent position. I might say, "Mercury has moved too close to the Sun to see it clearly." But you know I am only talking about how we observe it and I am not talking about Mercury actually moving towards the Sun.
Observational astronomy is full of this kind of thinking.
This lesson has covered some important concepts in observational
astronomy and I hope you have taken them in. Please don't be too disappointed that you did not learn a whole bunch of stars. (And you may already have known the ones I taught here this month.) I assure you that I will teach you a great deal more in the months to come. These first lessons (the January Lessons) are fundamental to the rest of the course and, like many introductory subjects, these first lessons are heavy on the "boring stuff"  but very important to understand!
Make a point to think about the Earth's movement as you watch the stars. Make a note
of the position of a few obvious stars ("Just above that
tree. To the left of that house.") and then take a look at
it a few hours later.
Note that circumpolar stars seem to travel from east to west and
from west to east because they never set. They just circle Polaris
so eventually they have to move the other way but the Sun
prevents us from watching them make a full circle through the
night. Any star that is not circumpolar must rise in the east
and set in the west, just like the Sun (and for the same
reason). On any particular night you will see the planets also
rise and set, following the same path as the Sun. [Planets
also have some tricky motions we will discuss in a future lesson.]
Before we met again (next month's lessons) be sure you get outside to make some observations, get your bearings and enjoy the night sky.
Wishing you clear skies.
Hey, wait a minute.
Should I get a telescope?
NO!
But all amateur astronomers should understand how a telescope works. So, in our next lesson, I will teach you about the wonderful area of physics known as "optics" and show you how astronomers bend light in order to better see the universe.


