Optical Devices
by Dr Jamie Love © 1997 - 2011
 © 1997 - 2011
All you really need to learn and enjoy astronomy is at least one good eye. If you have 20/20 vision (corrected with lens, if you need them) then you have all you need to observe and understand the night sky. As a matter of fact, many ancient cultures had "observatories" without telescopes from which they studied the stars and planets. These observatories where often elaborate structures with beams and columns positioned in such a way as to highlight or feature the position of certain objects at specific times of the year. Ancient astronomers learned plenty about the motion of the planets, Sun and Moon because they were experts at identifying the stars and constellations.
Of course, when you think of astronomy you probably think of telescopes because these instruments have provided a wealth of information and allow us to see much farther and better than our own eyes. Therefore, this would not be a proper astronomy course if I didn't explain how these devices work.
Who built the first telescope and when?
Most historians credit the Dutch with making the first telescopes as early as 1608. Many were exported and in 1609 a telescopic map of the Moon, showing details that can only be seen with magnification, was drawn by Thomas Harriot.
Of course, when you think of telescopes you should think of the
famous Italian scientist, Galileo Galilei. He made his own telescopes
and used them to make significant contributions to our understanding
of astronomy. In January 1610 Galileo used one of his telescopes
to discover Jupiter's four largest moons (which we often call
"the Galilean satellites"). However, a fellow named
Simon Marius may have seen them slightly earlier. Marius is certainly
credited with naming them - Io, Europa, Ganymede and Callisto.
[Jupiter's largest moon, Ganymede, may have been recorded by a
Chinese astronomer named Gan De in 364 BC, using nothing more
than his naked eye!  Maybe.] All historians agree that Galileo's telescopic observations were the start of
telescopic astronomy. Galileo did more than stare at the night
sky. He made serious observations and deductions that changed
our view of the Solar System, if not the universe! His careful
observations of Jupiter's moons convinced him that they orbited
Jupiter in the same way that the Moon orbits the Earth. His telescope(s)
showed him that the Moon was covered with craters and mountains
and this strengthened his opinion that the Moon was another world.
He saw Venus go through phases, like the Moon, and used geometry
to explained those observations. He also showed that the Sun
was "imperfect" - he observed that the Sun has
spots! (This may have gotten him into as much trouble with the
Church as his teaching of Copernican Theory, which you'll learn about later.) Galileo discovered
that the glow of the Milky Way was caused by countless stars.
He must have had a powerful telescope.
No, not really. His most powerful telescope gave him a magnification of only 30. All his telescopes, and all telescopes in the early 17th-century were refractors. Refractors use glass lenses to focus the light. When light passes from air into glass it gets refracted. Let's talk about this important phenomenon.
Refraction occurs with all types of waves but is most well known by its effects upon light waves. The physics of light can be very detailed and complicated, but we will only concern ourselves here with its "wave-like properties". Light also has "particle-like properties" but we will not discuss them. When a light wave passes obliquely (at an angle) from one medium (say, air) to another (say, glass) both the speed at which it is traveling and its direction are slight altered. That's refraction. Actually, it's the change in speed of the light that causes the change in direction, but this change in speed has little to do with understanding how a telescope works. It's the change in angle that is important.
| Notice in this drawing that the incident ray (incoming ray) is bent as it enters the glass and becomes a refracted ray. This change in the angle, from the incident ray to the refracted ray, can be calculated using an equation (called Snell's law, and requiring an understanding of trigonometry in order to enjoy it). Notice that it's the passage of the ray, from one medium to the next, that causes refraction. | 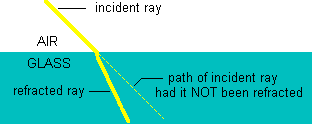
|
You mentioned the speed of light. How fast is light?
That depends. Light travels at different speeds depending upon what it's traveling through. Whatever it's traveling through is called the medium. Light travels through a vacuum at a speed of 299,792,458 meters per second and we abbreviate that as "c". Nothing travels faster than c for reasons I do not want to get into here, but which have to do with an area of physics called relativity. For our purposes please accept that nothing can travel faster than the speed of light in a vacuum (c).
The amount of refraction depends upon a quality of the medium
(air or glass) called the refractive index. When talking
about the refractive index of a substance it's best to compare
the index to a set value and, by tradition, we use a vacuum as
the ultimate medium. The absolute index of refraction (abbreviated as "n")
of a substance (air, water, glass, etc.) is the ratio of the speed
of light in a vacuum to the speed of light in the substance.
[Absolute index of refraction = speed of light in vacuum / speed
of light in substance.]
Because light travels at its fastest through
a vacuum (c), the absolute index of a refraction of any medium
will be a number greater than one.
[The absolute index of refraction through a vacuum is c / c = 1 and
any other medium would have an absolute refractive index of c
divided by "something less than c" which gives a number greater than 1.]
Let me show you some examples of what I mean.
Light travels through air slightly slower than through a vacuum
- slower by 89,911 meters per second (at standard temperature
and pressure). So, light travels at 299,702,547 meters per second
through the air. That means the absolute refractive index (n)
of air is 299,792,458 divided by 299,702,547 which equals 1.0003.
That's pretty small.
When a ray of light passes into water the
light is slowed down considerably. When a ray of light enters
the water it's slowed down to 225,407,863 meters per second.
That means the absolute relative index for water is 299,792,458
divided by 225,407,863 which equals 1.33. If you put a stick into
the water and look down on it you will see that it appears bent
at the interface (where the air meets the water). That is refraction
and it is caused by the fact that the light is slowed down as
it enters the water.
Glass has an absolute refractive index of 1.5 so it bends rays even better than water and it's a great material for making lenses.
But what makes the image larger?
The shape of the lens. The amount of bending of the light depends upon the refractive index but it is the change in the angle of the light that makes the glass behave as a lens.
First let's think about what happens when a ray of light passes through a window. As the ray moves from the air to the glass it is slowed down and bent slightly but when that ray reemerges from the other side of the glass is regains it normal speed (through air) and it's bent BACK into its original direction. A window pane is made of material with a uniform refractive index and its interface with the air has the same geometry going in as going out. (What I mean is a good window pane is made of the same substance throughout and shaped such that it has parallel surfaces. A bad window pane will cause some distortion.) That's why objects viewed through a window are seen "correctly" - not magnified or distorted.
|
A lens has CURVED surfaces and is constructed in such a way as
to focus a beam of light, traveling parallel to the axis of the lens, into a small region called the focal
point. The geometry is crucial and it can be proven, (using
geometry) that, if the lens is made from portions of a sphere,
parallel rays will converge at a single point - the focal point.
Such a lens is often described as "double convex" meaning it is outwardly curved (convex) on both surfaces. Some lenses are convex on one side only (and flat on the other side) and said to be "single convex". | 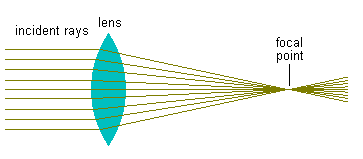
|
Both single and double convex lenses will cause light traveling parallel to the axis of the lens to converge onto a focal point so they are all called converging lenses.
All astronomical objects, and most other objects, are so far away from the lens that the light reaches the surface of the glass as parallel rays. A converging lens will focus those objects to the lens' focal point. The exact position of the focal point depends upon the amount of refraction occurring (due to the refractive index of the medium) and the shape of the lens. The more curved the lens the closer the focal point will be.
It's easy to find the focal point of a lens and most people have done this simple experiment using the Sun. If the rays from the Sun are passed through a converging lens they will converge on the lens' focal point. By moving the lens up and down you can create a small image of the Sun on the ground. That image will be a tiny dot of the Sun but it will contain the collection of rays from over the entire surface of the lens so the tiny image of the Sun will contain most of the light energy that was incident on the lens. This energy is concentrated to the focal point and can be extremely hot and dangerous. You can set paper alight with a converging lens by focusing the Sun's energy onto the paper. The smaller the image you create on the paper the hotter that image will be. If the image is made small enough, by positioning the focal point onto the surface of the paper, it will cause paper to smolder. If the lens is big enough, the paper will burst into flames.
It's dangerous to stare at Sun because it's so bright that
its rays can destroy your eye's retina. It is doubly dangerous
to stare, even briefly, at the Sun through a lens because
the energy is so concentrated, especially at the focal point.
NEVER STARE AT THE SUN AND NEVER VIEW THE SUN THROUGH
A LENS!!!
Astronomers use special filters to block out the Sun's
deadly rays but such filters are not easy to come by. You risk
your eye sight if you use homemade filters like smoked glass or
photographic film. These homemade methods are DANGEROUS!
OK, I won't risk my sight.
But what's the point of making
the rays converge if you cannot put that image in your eye?
Putting the focal point in your eye is not useful, but we are not done with our lesson on how converging lenses work. It may surprise you to know that in order to understand telescopes, you must first understand how a simple magnifying glass works.
|
For that matter, it is also important to understand how the lens in
your eye works!
Each of your eyes has a converging lens and most of the time we are looking at distant objects so the incident light rays from those objects reach our eye lens as parallel rays. That's why they converged at the focal point. In our eyes that focal point occurs at the retina, the light sensitive portion of the eye that senses the light. | 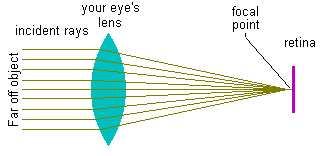
|
Our eye lens can change its shape slightly and that helps us to focus on nearby objects but that lens "reshaping" can only go so far. (And we cannot change the refractive index of our lens.) Most people cannot see an object clearly if it is closer to them than 25 centimeters.
| When we bring an object closer to our face, the object appears larger but we cannot focus on it. Notice that the rays from a nearby object are NOT parallel when they strike the eye lens. Our eye lens cannot produce a focused image on our retina so a nearby image may be closer, and therefore bigger on our retina, but we cannot see it well. | 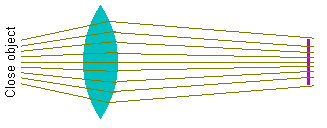
|
We use a "hand lens", or magnifying glass, to see objects close up. It's just another converging lens but we use it is a totally different way and create a totally different object. You see, a converging lens actually has two focal points - one behind it and one in front of it. We can use the focal point in front of a converging lens to help us focus on an object that is too close for our eye lens to handle.
|
Here you see an object that is within the focal point of the lens.
That is, the object is closer to the lens that the lens' focal point, which actually is behind the object. Notice that the rays coming from the object are NOT parallel BUT the lens makes them parallel! In order to make those rays parallel, the lens is moved back and forth until the distance between the object and the lens is just right. | 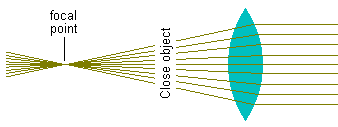
|
Now that the rays are parallel we can put our eye to it and see the object. But what we see is a virtual image of the object, not the object itself.
What?
A virtual image (sometimes called an imaginary image)
is an image created when the observed lines do not actually pass
through the object. The rays reaching our eye do not really come
from the point where we see the object. At first this might seem
like a lot of mumbo-jumbo but you are used to seeing virtual images
every time you look at a mirror. When you look at a mirror the
reflection you see is not really created by an image of you BEHIND
the mirror - it just looks that way. The mind simply imagines
that the image comes from behind the mirror. One important feature
of a mirror image is that the image appears to be exactly as far
behind the mirror as the real object is in front of the mirror.
You have to focus on the virtual image, in a mirror or in a lens,
as if it were actually at that distance, even though it is impossible
for the object to actually be there! 
A magnifying glass also creates a virtual image and by doing so it allows you to place the object you are examining closer to your eye than your ability to focus on it. But that's OK, you don't focus on it - you focus on its virtual image. In order to appreciate this kind of image we have to think a wee bit differently.
| In this diagram I have placed a black "A" between a converging lens and the lens' focal point. (I've labeled both focal points F.) I've drawn in only the lines that represent the tip of the "A" but the same idea would apply to all points on the "A". The eye sees the virtual object, not the real object, because the virtual object appears to be the source of the parallel lines. | 
|
That object looks farther away so the eye's lens can easily accommodate it and focus those parallel lines onto the retina. More importantly, the virtual object appears much larger than the real object. It has been magnified. The virtual object is further away than the real object but, because the real object is very close, the virtual object will show all the tiny details of the real object and you will be able to see them clearly.
OK, so why do I have to understand a magnifying glass, which I use to see things that are close up, to understand a telescope, that shows me things far away?
Because a refracting telescope uses two lenses and uses them in two different ways.
|
Let's have another look at the first way we used the lens but
this time let's consider an image. Like before, I am only tracing
out how one point on that image is projected through the lens
but every point on the object will follow a similar route and
the image formed will be the one on the right.
What do you notice about the image formed by this converging lens? | 
|
It's upside down and smaller!
Well, yes it happens to be smaller in this diagram (because I
am struggling to create a correct image that will fit on your
screen). To really do this correctly I would have to use a much
larger screen and work with different angles that are hard to
see. But think about this for a moment ... if we used a lens to
project an (upside-down) image of the Moon, you would be correct
to say that the image was smaller than the Moon. (Otherwise the
image would have to be as big as the Moon!  Right?) My point is
that I have to use dimensions that will be useful. A different geometry
could give you a larger image but that isn't important here. As
you will see later, the size of the image is not the issue - not yet.
Alone, this lens is only good for magnifying objects that are within the distance from the lens to the focal point in front of the lens. That's how a magnifying glass works (as you learned a moment ago). Here the object is well past the distance from the lens to the focal point. Here it is acting like the first lens you saw earlier. I've drawn only three rays coming from the tip of the "A" but they are three particularly useful rays.
|
Let's follow each ray and see if it obeys the ideas we have
been learning.
The upper ray is the only one that is truly parallel. It's parallel to the axis of the lens. That ray was refracted through the focal point behind the lens, just like you learned about before. The other two rays require a bit more work and thought. | 
|
The middle
ray is actually passing dead center through the middle of the
lens. That ray will emerge from the other side unchanged (unbent)
because the shaped of the lens at the point at which the ray entered
the lens is exactly the opposite shape from the part of the lens
from which the refracted ray leaves the lens. That causes that
ray to be "re-refracted" and continue on as if it had not
been through the lens at all! It's a straight line like you would
get through a pane of window glass.
I've drawn the lower ray to
pass through the focal point in front of the lens. That is convenient
because I know that a ray passing though that focal point will
emerge from the other side of the lens as a line parallel to the
axis of the lens!
Take a good look at that drawing and see if you can follow my logic as I described it. These three lines, or rays, are used throughout optics in order to describe how a lens works. The effect is that the image of the object is formed upside-down. This is NOT a virtual image because here the ray actually passes through the image. We call this a real image.
How about a summary?
OK. All converging lenses produce an, upside-down but real image when the object is beyond the lens' focal point. And, all converging lenses produce a large, right-side-up but virtual images when the object is between the lens and its focal point.
Alone, a single converging lens is of little use but combined with a magnifying lens we get a refracting telescope! The first lens collects the light and the second lens magnifies it. Here's how a refracting telescope works.

The first lens is called the objective lens because it's the lens that collects the light from the object you are viewing, say the Moon or a distant letter "A". Here I have the geometry setup in such a way that the objective lens is producing a bigger image but that's not the point. The whole point of the objective lens is to CONCENTRATE the light. That's very important in astronomy because the object you are trying to see is usually pretty dim. What good would it be to magnify it if it was then too dark to be seen? The bigger the objective lens, measured as its diameter, the more light it can collect so a good telescope must have a big objective lens (although there are other considerations for a good telescope but we will get to them later). The diameter of the objective lens is usually referred to as the lens' (or telescope's) aperture. The bigger the aperture the more light the lens can collect.
The other lens is called the eyepiece because it's held very close to the eye. This is the magnifying glass and its purpose is to magnify the image produced by the objective lens. You might think that the eyepiece would be positioned so that it is focusing on the focal point from the objective lens, but you would be wrong. If you focused on the objective's focal point you would only see a dot - not an image. So the focus of the eye piece is positioned slightly behind the focal point where the upside-down (real) image is projected. The eyepiece then magnifies that image.

Notice that the focal point of the objective lens (Fo) is very
far from the lens. This distance, called the focal length
(of the objective), is more like the realistic situation inside
a refracting telescope. The long focal length allows you to form
a real image which in this case is bigger than the object. (But,
remember that's not important - you are NOT going to be able to
fit the real size of a star or planet inside your telescope.  )
Most importantly, an objective lens with a long focal length has
greater magnification that one with a shorter focal length.
A long focal length also helps to stops chromatic aberration, a "defect" found in all lenses producing false rings of color. When light is bent through a lens, the different wavelengths of light (the different colors) do not bend equally. Blue light is refracted more strongly than red light. (Which, by the way, is why our sunlight sky is blue not red - but that's another story.) This means that a lens will have a slightly different focal point for each color. The "blue focal point" will be closer to the lens that the "red focal point". When the observer tries to focus on the real image (made by the objective lens) fuzzy colored rings would appear around the image. That's because there is a different "perfect focus" position for each color! The effect is very pretty but very much unwanted. To reduce chromatic aberration, early refractors had extremely long focal lengths which meant the telescopes themselves were very long. This made the telescope difficult to use and house. If you visit a museum or see drawings of old telescopes you'll see that most of them are so long and thin as to be "pencil-shaped".
Modern objective lenses are actually made of several lenses of different refractive indexes fitted tightly together in order to compensate each other's chromatic aberration and thus produce an image that has all the colors focused to the same point.
Before leaving the topic of the objective lens, I think I should bring up the subject of focal ratio - the focal length (distance from the objective to the focus point) divided by the aperture (diameter). A high focal ratio (9 to 15) has a narrower field of view but good contrast, so the image it produces tends to be magnified well by the second lens. A telescope with an objective lens giving a high focal ratio is best for viewing the planets and Moon because you can see the features well. A low focal ratio (4.5 to 6) produces a wider image but of low contrast so it is best for a telescope designed for deep sky viewing.
Can we get on to the eyepiece?
Of course.
The smaller the focal length of the eye piece, the greater the magnification. (The exact opposite of the objective lens.) A 12 millimeter (12mm) eyepiece will give you more magnification than one that is 40mm. This value is usually written along the eyepiece tube.
The magnifying power of a telescope can be calculated from the focal lengths of the two lenses. Magnification equals the focal length of the objective lens (Fo) divided by the focal length of the eyepiece (Fe) or M = Fo / Fe. This equation shows that, for maximum magnification you want an objective lens with a long focal length and an eyepiece lens with a short focal length.
However, the greatest USEFUL magnification you can get is less
than twice the diameter of the aperture, measured in mm. So, if you have
an objective with a diameter (aperture) of 75mm, you would
be wasting your time trying to magnify its image by more than
150 times (150X). That's because if you magnified it much further
the image would become too dim to be seen!  This "dimness threshold" has nothing to do with the physics of the telescope - it has to do with the limited sensitivity of the human retina and our brain's ability to process limited amounts of information. ["Electronic eyes" called CCDs or "charged coupled devices" are able to detect light at much lower levels so astronomers will often place CCDs at the place they would normally place their eye in order to collect more information - and feed it directly into a computer.]
Let's try an example to see what I mean.
Assume you have
a telescope and the focal length of the objective lens is 600
millimeters (60 centimeters). If you were to use an eyepiece with
a focal length of 10 millimeters the magnification would be 600
/ 10 = 60. OK, that's good magnification but how big an aperture
must the objective lens have in order to collect enough light
to make that 60X magnification useful?
That scope must have an
aperture of at least 30mm in order to collect enough light
to make the 60X power produce an image that is bright enough to
see. [That's 60 / 2 = 30. You can use what ever units for the
focal lengths you want to calculate the magnification and ratio,
but when it comes down to the useful aperture size, the answer
is in millimeters.]
The "twice rule" is the absolute limit -
it assumes you are using a fantastic objective lens and perfect
construction. You would be smarter to think in terms of a "once
rule"- expect USEFUL magnification less than the diameter
(in millimeters) of the objective lens. So, to get the most from that
telescope and give yourself some room for error, you might want
to have an aperture of about 60mm (about 2.4 inches).
OK, but the image is still going to be upside-down. Right?
Yes. And to make matters worse, left and right are switched around too, making the scope very difficult to aim or to track an object.
In order to flip the image right-side-up, some scopes will add another lens, acting as a second eyepiece lens. This third lens will do exactly what the eyepiece lens does - produce a (virtual) upside-down image but, because the image is already upside-down, this additional lens simply inverts it into the correct orientation. These are often called spy glasses or terrestrial telescopes. The third lens adds more length to an already long tube.
A better solution is to use a prism to invert the image. A prism is a piece of glass cut in such as way to give total internal reflection. If a beam of light tries to travel from a medium with a high refractive index to one of lower refractive index, the beam will be totally reflected, within the glass, if the angle of the incident beam exceeds a critical angle (which is dependent upon the properties of the medium). That's total internal reflection. Diamonds (which, by the way, have a very high index of refraction) are often cut to take maximum advantage of total internal reflection. The beam of light becomes "trapped" in the diamond and when it eventually emerges it comes out as a sharp brilliant beam, causing the gem to sparkle.
| Binoculars have two prisms designed to create total internal reflection. One prism turns the beam right-side-up, as shown here. The other prism, which is set at a right angle to the first, then turns the beam (image) around again to reverse the horizontal orientation. These prisms not only return the image to the proper orientation but also allow the focal length to be "folded" so the length of the tube between the objective and the eyepiece can be shortened considerably. | 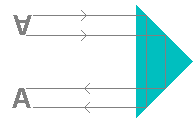
|
Great! Do all telescopes work this way?
Yes and no.
So far we have limited ourselves to all the tricks that you can do with lenses but in 1668 Isaac Newton invented a telescope that used a mirror instead of an objective lens.
|
His reflector telescope
used a curved mirror, called a primary mirror, to collect the
light from the object and focus it to a point where the eyepiece
could image it.
In a reflecting telescope the light from the object travels down an open tube and falls upon the primary mirror at the bottom of the tube. That mirror reflects the light, while compressing it, back up the tube where it meets a small, flat mirror (the secondary mirror) inclined at 45 degrees. This tiny mirror reflects the image to an eyepiece where an image is formed (just like before). | 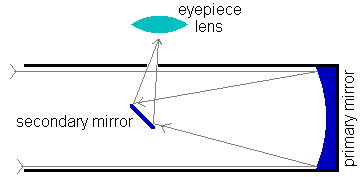
|
Doesn't the secondary mirror block the view?
Not really, although it's easy to think it might. Plenty of the image comes into the tube around the secondary mirror. The primary mirror of a reflecting telescope serves the same function as the objective lens in a refractor telescope - to collect light, not to form an image. The larger the primary mirror, and therefore the diameter of the tube, the more light gets collected, just like the aperture dimensions of an objective lens on a refracting scope. Indeed, most of the physics of a reflector are identical to that of a refractor. The layout looks a bit strange but the same the rules apply.
Reflecting telescopes have some distinct advantages over refracting telescopes. There is no objective glass so chromatic aberration is very small. (It's only introduced by the eyepiece lens and that is next to nothing.) Also, very little light is lost by reflection while considerable amounts of light are lost (and scattered) as it passes through an objective lens. The overall length of the tube of a reflector can be made shorter. That means reflecting telescopes are easier to support (on tripods and other "stands") and less expensive. Perhaps the only disadvantage of a reflector scope is that the mirrors need to be recoated periodically (usually with aluminum). They also tend to get whacked out of alignment easily.
Newton's first reflector used a mirror only one inch in diameter but it convinced astronomers that reflection was the way to go. All the large telescopes in the world (and the one orbiting the world - the Hubble Space Telescope) are reflector telescopes.
There are different variations on the standard reflector telescope. The one I have illustrated is based upon Newton's original design and is known as a Newtonian reflector.
| A Cassegrain reflector uses a curved secondary mirror (as well as a curved primary mirror) and that allows the scope to "fold" the light path even further so they can have very short tubes. The ones I've seen send the light path out through the bottom of the tube, directly beneath the secondary mirror. That's a good idea because you aren't going to collect any light there (on the primary mirror) because that area is in the shadow of the secondary mirror. | 
|
Some of the largest reflectors in the world use a geometry called the primary focus. The astronomer actually sits in a chair (actually a cage) INSIDE the telescope. S/he sits near the focal point of the primary mirror.
A catadioptric telescope combines the features of a refractor and a reflector in an extremely small, compact tube. It's very "user friendly" but very expensive. One type, the Schmidt-Cassegrain, is becoming popular especially among serious amateurs who want high magnification without the hassle. One model I've seen even has a computer programmable system that will find and track any star you want!
What kind of telescope would you recommend?
I wouldn't!
A good telescope costs as much as a good car and a bad telescope is not worth owning. Also, like a car, a telescope requires some skill to use it correctly and to maintain it. Also, telescopes require investing in a good tripod, called a mount. (Nothing is more annoying than watching objects wiggling under high magnification because your expensive telescope is mounted on an inferior stand.) You will probably want multiple eyepieces and perhaps other accessories (like a 2X Barlow, finder scope, warm clothes, etc.). The really "professional" amateurs will build a home observatory for their scope(s) - kind of like a garage for a car!
Even a very good amateur telescope will NOT show you objects as beautiful and as clear as those you see in textbooks. Don't kid yourself or waste your money. Those kinds of pictures are taken with VERY large telescopes by expert astrophotographers using long exposures and lots of failed attempts.
Remember, you do NOT need a telescope to learn astronomy!
Wait until you have completed this course, (so you'll understand the basics) then join a local astronomy club. They can show you exactly what you can expect from each kind of telescope. After you have decided that you like a particular scope (because, for example, it gives you a great view of Jupiter's moons and Saturn's rings and you aren't too bothered that you won't be discovering new galaxies) buy it - perhaps a used one or at a discount through your local club. Then, through the club, trade eyepieces, learn about photography, and get some hands-on experience so the next scope you can afford will be the perfect one for you. The club might even help you build a telescope!
Do you have a telescope?
Nope, I haven't owned a telescope in years. They are not only
expensive but bulky and more troublesome than kids! (OK - some
kids.  )
)
What about binoculars?
Ah, now you're being sensible.
Binoculars would be useful, but not required, for this course.
You may already have a pair. The magnification may not be high
but they allow you to explore the night sky with a wide field
of view.
If you decide to buy binoculars keep in minds that the same rules of optics apply to binoculars as with refractor telescopes. The outer lens is the objective lens and it will gather all the light so try to get as big an objective lens(es) as you can handle. Avoid the temptation to buy those Zeiss "20 by 60s" (that's 20X with 60mm objectives) unless you have lots of money to spare and lots of muscle to hold those monsters steady. Of course, you can also buy a stand on which to mount your binoculars. Most people need a stand for binoculars with magnification above 12X.
A 50mm objective lens collects as much light as a small telescope
and a magnification of 7X is about right. Most people can hold
steady a pair of "7 by 50s" binoculars. Try before you
buy. Avoid zoom binoculars because it's difficult to keep a pair
that will zoom both lenses correctly. Stay away from anything
with plastic lenses or that says "permanent focus".
Be sure to get one with a safety-cord and be sure to use it. (I've
seen people just drop their binoculars because they thought it
was looped over their neck! It's an awful mistake.  )
)
So, if you have some money to spend, buy a set of binoculars.
See you next month.
Wishing you "Clear Skies".
Jamie  (Dr Love)


